Mastering Patient Registration in Ciyex EHR: A Step-by-Step Guide

The efficiency of a modern medical practice begins at the front desk. A clean patient registration process ensures accurate billing, improves patient communication, and streamlines the clinical workflow. If you are using Ciyex EHR, navigating the "New Patient" module effectively is the first step toward high-quality data management.
In this guide, we'll walk you through the exact steps to register a new patient in Ciyex EHR to ensure HIPAA compliance and data integrity.
Why Accurate EHR Registration Matters
Inaccurate data entry costs US healthcare providers billions annually. Using a structured EHR like Ciyex helps mitigate:
- Duplicate Records: Preventing fragmented medical histories.
- Claim Denials: Ensuring insurance details match payer databases.
- Communication Gaps: Setting up the Patient Portal correctly from day one.
Step-by-Step: Registering a New Patient in Ciyex
Step 1: Access the Registration Module
Log into your Ciyex dashboard. The interface is designed for quick navigation:
- Navigate to the Tools module on the main sidebar.
- Select the Manage Practice Data button.
- Click on Patient Information. This is your central hub for all patient records.
Step 2: Run a Preliminary Search (Search-First Logic)
Before clicking "Add New," always search for the patient by Last Name or Date of Birth. This is a critical "best practice" to prevent duplicate entries that can complicate billing and clinical charting later.
Step 3: Enter Core Demographic Data
Once you select Add New Patient, a structured form will appear. Accuracy here is vital for identity management.
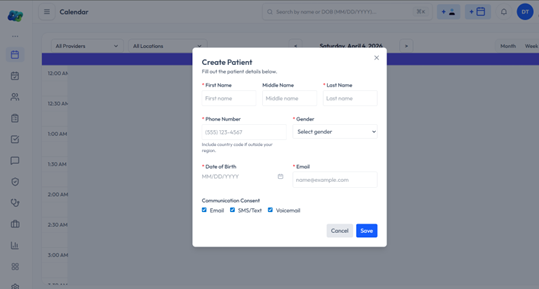
- Full Legal Name: Must match their government-issued ID.
- DOB & Gender: Essential for unique identification.
- Contact Info: Include cell, home, and work numbers.
- Address: Provide a complete street address (City, State, Zip).
Step 4: Social and Professional Details
Ciyex builds a holistic patient profile by capturing social determinants of health:
- Employment Status: Select from the dropdown (Full-time, Student, etc.).
- Identity Data: Record preferred language, race, and ethnicity to meet MIPS/MACRA compliance.
- Email Address: Mandatory for Ciyex Patient Portal invitations.
Step 5: Finalize the Record
Double-check all fields for typos.
- Click the Add Patient button at the bottom.
- Confirm the entry in the pop-up window by clicking Okay.